Club Articles
Sections
Table of Contents:
(A)
(B)
(D)
(E)
(F)
Galleries
Member Cars
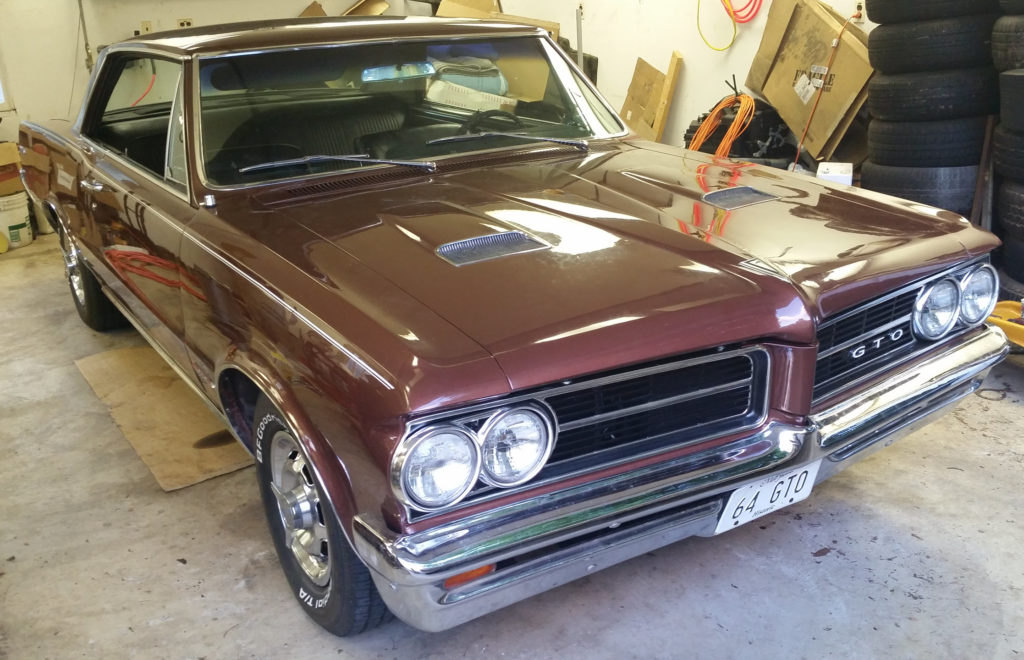
Mike Schuncke’s 1964 GTO
(Widetrack Panic)
September 2025
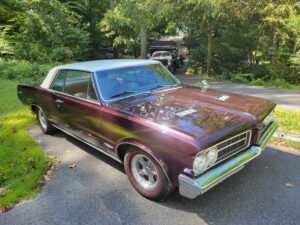
I received a call from my friends back in January 2025 and they needed a place to store a couple of their fathers cars, who had recently passed away. (RIP Mac) I had room so we had them moved to my house. 1964 GTO and 1957 T-Bird. I have always loved Pontiacs, and now one was sitting in my driveway. It had been in storage for 5 years, but it looked beautiful. I drained fluids, added a battery, changed out fuel filter and rebuilt the Carter AFB and it fired right up. The exhaust note was quite seductive and really pulled me in! We had it appraised, and became a first time Pontiac owner. Everyone in the Royals has been great in terms of encouragement, advise and friendship in getting this car back on the road. Other than appraisal and PHS history, I do not have a lot of background on the car. Previous owners appear to have taken good care of it. No obvious damage or rust repairs were noted. Fuel tank/lines and brake lines were replaced before it went in storage. It was originally Gold, but was resprayed probably 20yrs ago. The original 389 4bbl still resides under the hood with 114k miles on the clock. The S-T automatic was replaced with a TH350 sometime in its past. The car was well optioned from the factory with A/C, power steering/brakes/windows/defrost.
Jeff Raff helped me out with getting the first round of maintenance issues that a 61yo car presents. Water leaks around windows have been resolved and trunk pan looks like new! I was able to get it to the Royals car show last month. Future projects I am looking at are power disc brakes for the front, heater core, and fixing fuel gauge as well as adding gauges under the dash. The is a 60s era sun tach on the column that I need to hook up. AM radio is out getting repaired, and will go back in when done along with a Marantz FM converter in the glovebox. I do get some vibration >60mph, so need to go through steering/suspension.
My goal is to have a somewhat original, reliable, safe and drive-able classic. The GTO was one of the first muscle cars, so I want to do my part and represent where it all began.
Widetrack Panic refers to my initial reaction the first few times I drove the GTO, as it took a little getting use to its wide stance on the road. It is also a nod to one of my favorite bands from Athens, GA still going strong after 40yrs.
Michael Sledge’s 1971 GTO
January/February 2024
Text and photos by Michael Sledge
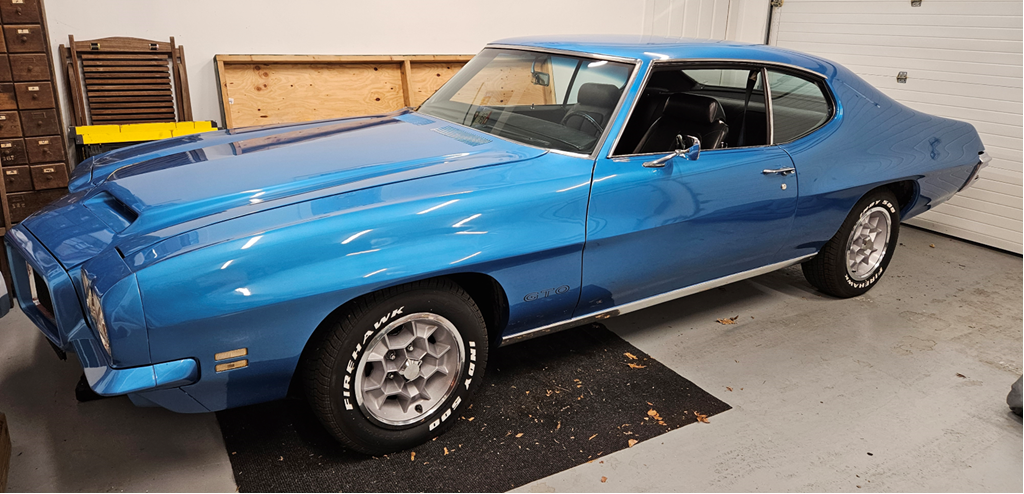
I bought my ‘71 GTO in New York state almost 20 years ago. It was pretty much an all-original car that came from Arizona, and it was the right color Lucerne Blue with the honeycomb wheels. The only thing that would have been better is if it were a four-speed car. I have only in the last year really driven the car much. Before that just short trips around DC and it sat in the garage for years when I lived in England.
Covid was a good excuse to sort things out. My ‘71 GTO is a 400/300 hp automatic car with well over 100 thousand miles on it. I was told it was rebuilt sometime in the past but hard to say. It ran good but kind of lazy or am I just used to modern fuel injected cars and modern automatic transmissions? I spent most of the lockdown repairing everything (fuel pump, gas tank, timing chain, fluids, hoses, plugs, rebuilt carb with new bushings in base plate etc.) Big improvement with the drivability but I was still not satisfied; it ran well but I felt there was more to be had. So, after some research I purchased a Mr. Gasket mechanical advance curve kit for my HEI distributor.
The HEI distributor is the only non-stock item on the car. The kit came with springs, new weights, and nylon bushings. I made sure to take photos, so I did not forget anything. The Gold- heavy were just like the stock springs so I installed the Silver-medium springs taking care to install the new weights and bushings and lightly grease the shaft. A quick test drive was disappointing as it was no real difference. A few weeks later I installed the black light springs which made huge improvement. They claim the advance is all in by 3000rpm. I now have the initial timing set at 12 and the distributor has 23 for a total of 35 degrees which should be good.
I am planning to go back to the stock distributor in the New Year and upgrade it with an electronic conversion kit for a more stock appearance. Plan to just run it with the points initially to see how it runs more for my own curiosity than anything thing else before installing the conversion upgrade.
I plan to fix a gas tank neck leak in the new tank (they sent three and this was the best one as the other two were damaged.) New springs in the driver’s seat and just basic maintenance. I still must get the tires balanced better. The honeycomb wheels are almost impossible to get balanced properly. A radio would be nice as well.
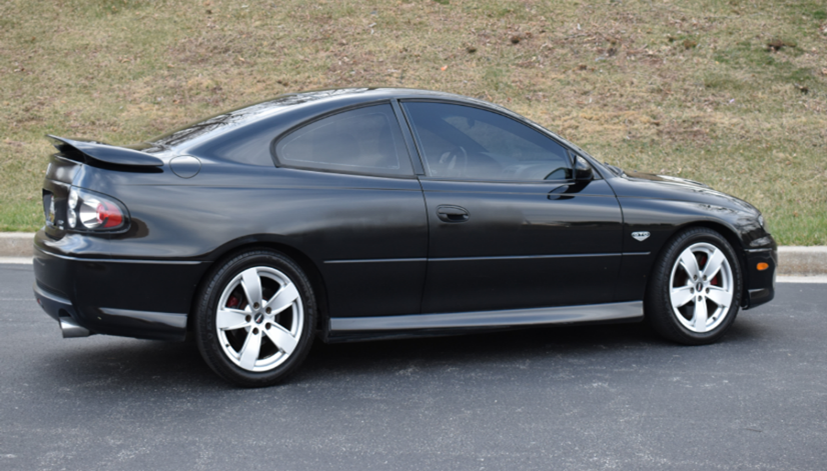
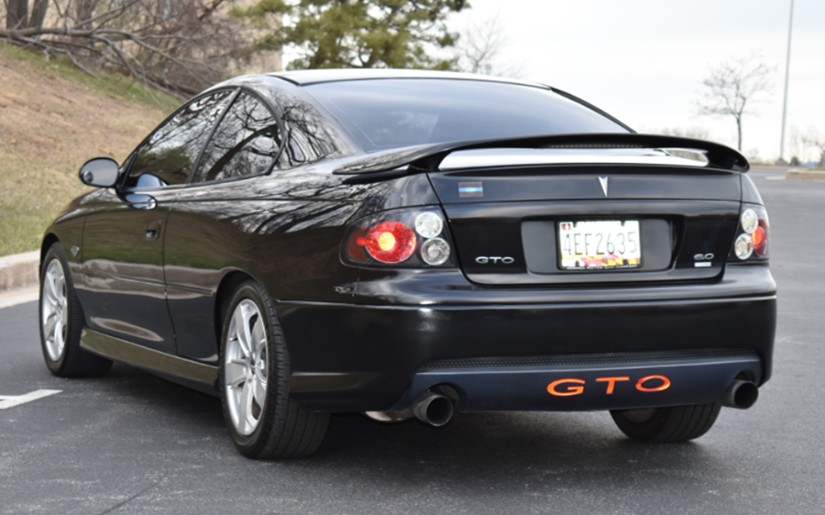
James and Kesiah Moore’s 2005 GTO
March/April 2023
During the height of the Covid pandemic, I found myself searching for a car. I didn’t need a car, but I wanted a specific “hobby car,” one that my wife and I could work on together. Initially, I wanted a Ford Mustang, but prices were high at the time, and most didn’t have the horsepower I desired (ed. note: thank goodness he came around). I always had an affinity for Pontiacs. I already owned a 2003 Bonneville and my wife’s first car was a 2006 G6 GTP she named “TURBO.”
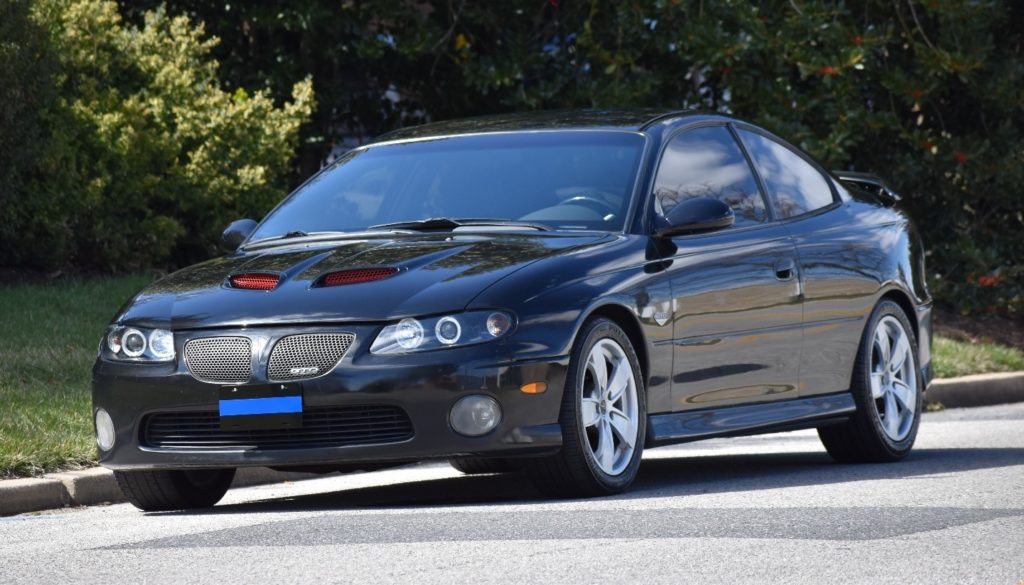
I started looking for other options, and soon I found a GTO in Torrid Red that really caught my attention. I called the dealership and planned to take it for a test drive however, after only two days, the GTO sold. My wife encouraged me to keep looking, and eventually we found our ‘05 GTO in Phantom Black Metallic at a dealership in Cherry Hill, NJ. We arrived at the dealership and requested a test drive. After just five minutes, I knew I wanted this car! But did Kesiah like it? I told her to drive it, and after five more minutes she said, “take this home!” My wife and I both share a love of NASCAR, and Kesiah could only think of one name to give our newly found GTO: “The Intimidator,” after Dale Earnhardt.
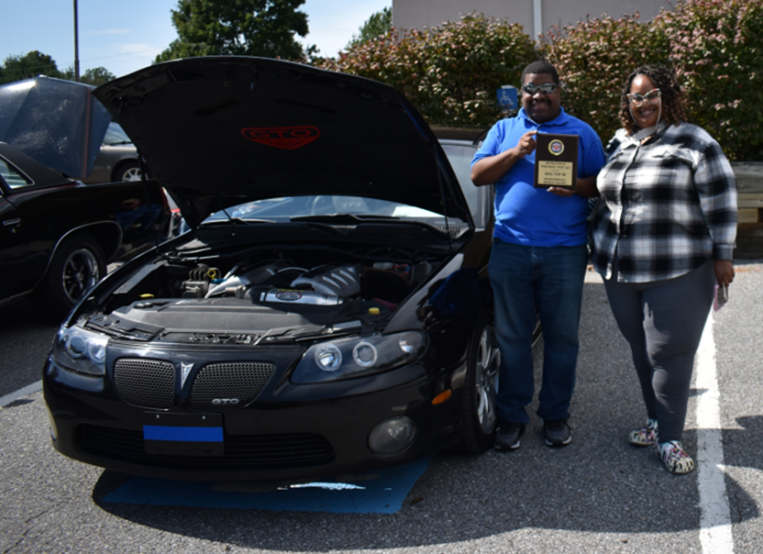
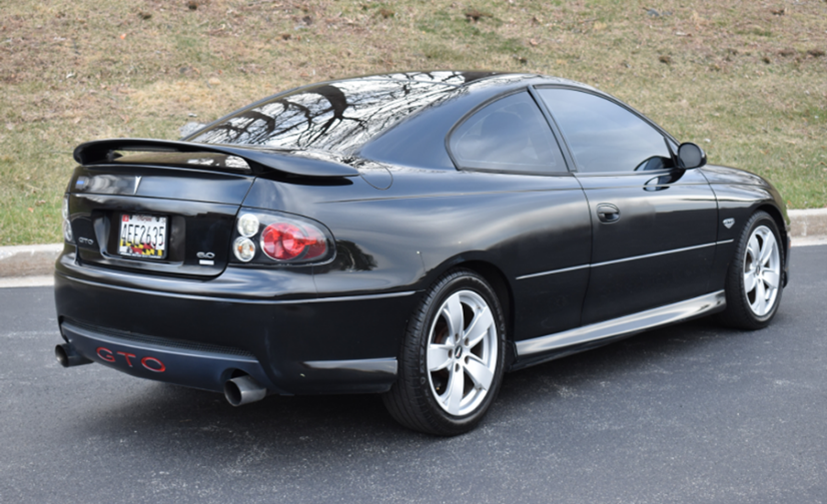
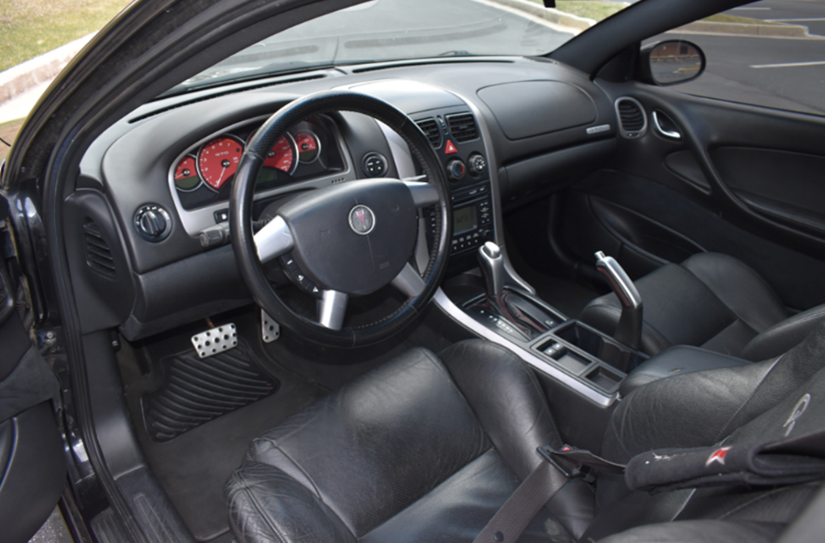
We have worked very hard to restore the GTO to her original glory, replacing the headliner, hood liner, the front suspension (with original parts) and repainting her (with an added flare of red hood scoop inserts). One thing I love about “The Intimidator” is to me (and much of the world) she is a sleeper and rare (ed. note: ‘05 GTO production was just 11,069 units with 3,176 in Phantom Black Metallic: a scant number compared to the highest production year of 1966 with 96,946 units built). She will idle next to you at a stop light, and you won’t notice or hear anything out of the ordinary. But once you give her some gas, your heart will skip a beat, along with the heart of the occupant in the car that was just next to you. Some folks aren’t even aware of what the car is, asking questions like “what is that?” or “who built that?” I just tell them it’s a GTO, by Pontiac.
We’ve made some upgrades in the last 3 years, including the addition of an AEM Brute Force Cold Air Intake, a Borla ATTAK cat-back exhaust system, and a dyno’ tune to extract the best performance from her. We also added some additional safety features such as LED headlights.
We have so many plans in the works regarding upgrades and furthering the car’s preservation. For us, this GTO is a symbol of love, hard work, dedication, and ingenuity. We enjoy taking it out for Sunday drives, participating in shows, and occasionally doing a burnout in our driveway. We plan and hope to enjoy it for many years to come. We hope to spread our love of Pontiacs to the local car world and future generations, so they will know Pontiacs were built for excitement!
Hampton & Shannon Conway's '70 GTO
July/August 2022
The day I saw my dad drive his new 1956 white-over-blue Pontiac Chieftain up our driveway I was in love with Pontiacs. It had no center post between the doors and we called it a “4 door hard top convertible”. I was nine and that car was so classy and powerful! As I grew older, I noticed that Pontiacs were winning NASCAR races in the late 50’s and early 60’s. I was really hooked!
I went to my first car shows in D.C. and once again the Pontiac love bug hit me in the form of a Marina-blue 1965 Pontiac LeMans 326 4-speed hardtop. Then I got hit hard when I saw a 389, Tri-Power, 4-speed yellow-with-black-top GTO. You know the drill: “I got to get one of these.” It didn’t happen. I took a job with our government and only had enough money to get a 1958 baby-blue Chevy Bel Air 3 speed on the tree.
I joined the Army in 1966 and while in Vietnam my wife (to be) needed a car to drive for her new job as a teacher. I asked her to check out the Pontiac GTO for us. Her family were “Plymouth” people. While picking up her mom’s car she noticed the Plymouth Road Runner.
I didn’t know what it was. She sent me the brochure so I could learn about it. She told me it was much cheaper than the GTO, and that was the truth. We purchased a red Road Runner 383 3-speed automatic. My wife was the coolest teacher on the staff of Wheatly Elementary. The kids loved the Beep-Beep horn. It was a quick car even with the 3.23 gears. Four years after that purchase, in October 1971, our Road Runner was stolen from us in a church parking lot.
That opened the door for our GTO purchase. After the financing was settled on the stolen Road Runner, I noticed a co-worker was selling his 1969 Limelight Green, 400 4-speed, 3.90-geared GTO to purchase a home. We bought it, our #1 GTO.
That car was with us until September of 1981 when a 1971 Camaro driver, coming the other way around a corner, lost control of his car and hit me head on. The impact trapped me in my GTO for a while, but I was ok: my GTO was totaled. Jerman’s Automotive in Gambrills, Maryland had just rebuilt the motor.
I had a ‘65 Tri-Power. My brother-in-law Vernon had a ‘66 Tri-Power with the larger center carburetor on his 1965 GTO. We traded because his cam and engine couldn’t handle the larger carburetor. It was a win-win for both of us. The ‘69 GTO was a fun ride. Sadly, Vernon’s GTO was stolen in 1979 at a club in DC.
My next GTO (#2) was a blue 1970 400 automatic. My oldest nephew ran it through a telephone pole on Fort Meade. After that, I purchased a white 1970 GTO (#3), which I parted-out: I took the front clip to use it on GTO #2 while my other nephew, Bryan, took the 400 engine to replace the 350 that was in his 1974 red GTO; another win-win. I sold the remains of #3 to a friend on the Eastern Shore who was repairing his son’s 1970 GTO.
While reading the Washington Post, I came across GTO #4, a 1970 yellow-with-black-vinyl-top 400 automatic. After owning it for a year, I changed the rear gears to 3.90s and replaced the engine with the rebuilt one from GTO #1 on a Labor Day weekend. I drove that car to work on the Tuesday after the Labor Day! It was a nice driver. I had an accident with it. I was hit in the rear. I parked it because my wife and I got into motorcycles. I ended up selling GTO #4 in 1999.
Our motorcycle riding ended after a riding trip from Maryland to California to Maine and back to Maryland. It took us 37 days for a wonderful ride with my best friend of 58 years; 53 years married! After that trip, August 1st, 2005, about 6 miles from our house, a tractor trailer ran a red light and hit me on my motorcycle. That accident caused me to lose my left arm and closed the Gold Wing chapter of our lives.
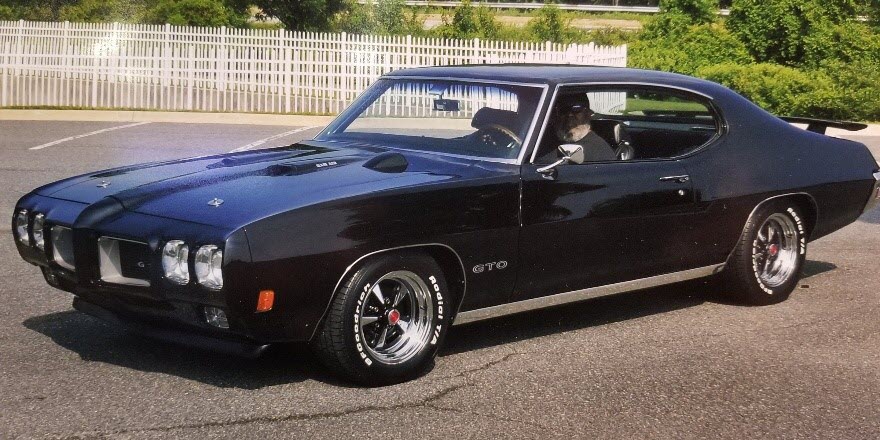
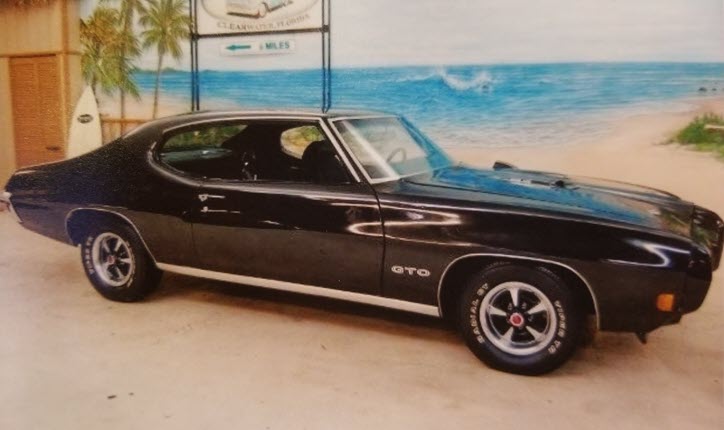
We still liked to travel, so we went into traveling by RV for our next venture. We also like to spend winter in Florida. In February of 2009, I visited a classic car dealer called “Golden Classics” in Tampa. Both our kids went to college there, so the dealer, Don, knew me. He would tease me about how many cars I was taking home in my dreams!
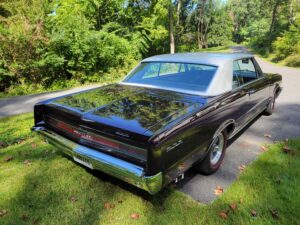
I did laugh with Don until I went around the corner and saw a black 1970 GTO, 400, 4-speed with air conditioning and a 3.42 12-bolt Safe-T-Track rear. I talked about that car so much when I got back to our motorhome that my wife asked to see it. I took her the next day. While I was talking to Don, she walked up behind and whispered to me, “ask Don how much for the car.” I said to her, “girl, don’t play with me.” She replied you know we ought to get another one. I asked Don what he wanted for it. He told me $33,000. I told him I could write him a check for $25,000 today. He said, “you know, you’ve been coming here for years; I’ll take your $25,000.” We took delivery of GTO #5 in May of 2009. Since owning it we have changed the clutch and pressure plate, added chin and trunk spoilers along with new 15-inch chrome Rally II wheels. I really like the Tri-Power look but will not put it on this one. It’s black inside and outside and its beautiful. Someone asked me if I had a name for the car? I didn’t, but I refer to it as my Black Thunder. That’s my continuing GTO story!
Hampton & Sharon Conway
Guy Riffle's '64 GTO (Chocolate Bar)
March/April 2022
My friend, Bobs, wanted to sell his car to a friend who would take care if it instead of having the Feds take it. He was straying and was caught by his wife, who turned him over to the IRS for a seven-year personal and business audit.
When I picked it up in 1993, the Super-T10 transmission was in a plastic tub because he blew it up (again: stripped every tooth of the input gear.)
The engine was in pieces in the barn where the car sat. We finally got everything together on the trailer and headed home.
One of the strange things about the car was that it was ordered with air conditioning but no console. It started as a Grenadier-Red car but was painted in the late ‘70s with Metallic Brown from DuPont Imron. Our new president, Stuart, went to our friend’s, Gene’s, house one afternoon. Gene came outside (remarkable by itself!) and was frantic with laughter that Stuart see the paint job that Bobs had just put on his ‘64 GTO. Gene opened the side door to Bobs’ garage, revealing the brown GTO, and asked Stuart what he thought of it. Stuart replied (honestly) that “it looks like a great big chocolate bar!” Gene laughed hysterically. The car is still known as Chocolate Bar, or CB for short. The paint is starting to check now, some 40 years later.
I collected the engine parts and decided to try a machinist that left Burtonsville Performance to open his own shop in Laurel. He should do fine!
The past owner decided on a 428 crankshaft, .030”-over 455 pistons, and custom long connecting rods. I didn’t want to start over so I followed his lead.
I talked to the Pontiac specialist at UltraDyne Cams, who ground a solid lifter cam for the car based on its configuration.
I forget what intake manifold it had: was it Tri-Power or a four-barrel?
The car ran better than I expected, but under load it would throw fanbelts every time. I know now that I had the wrong water pump on the car that was a little longer than needed so the pulleys were not lined up. The last time I had CB at the track (when the club rented the MIR track,) the car well but kept tossing the belts and I found that three passes down the track used two quarts of oil: the new rear main seal was leaking! I limped to the nearest gas station, bought oil and new belts (because I didn’t realize my mistake at that time,) and nursed CB home. I would trundle her around home a little for friends but soon noticed that she would fall on her nose when I reached 3300 RPM. Well, well, the valve springs were toast.
I replaced the 428 with a “temporary” 455 from a friend. The 455 remained in CB for some 15 to 20 years.
I finally started cleaning my garage by working on the 428: all it needed was new valve springs and a rear main seal, right? When I pulled the main bearing caps, the bearing didn’t look right. I sent pictures to Bub Whitaker, and her said that indeed the bearings were toast (after about 500 miles!) It seems that the block wasn’t completely cleaned of abrasives when the engine was last worked on (at the shop that closed after one year.)
No messing around this time: I asked Bub to take the engine and do what was needed to make it right and last a long time. It turns out that the last lobe of the camshaft was wiping, so I ordered a copy from Bullet Cams, who had absorbed UltraDyne.
I had to install longer push rods and adjustable rod guides (what a pain!)
When everything was ready, Bub and Chuck dynoed the engine and made sure that there was no metal in the break-in oil. At last, I was ready to install the engine.
When I pulled the temporary 20-year engine, the engine bay looked tatty so I stopped and painted the engine bay. While I was at it, I pulled the passenger fender and replaced the AC expansion core, hoses, compressor, and modulator in preparation to get the AC working again.
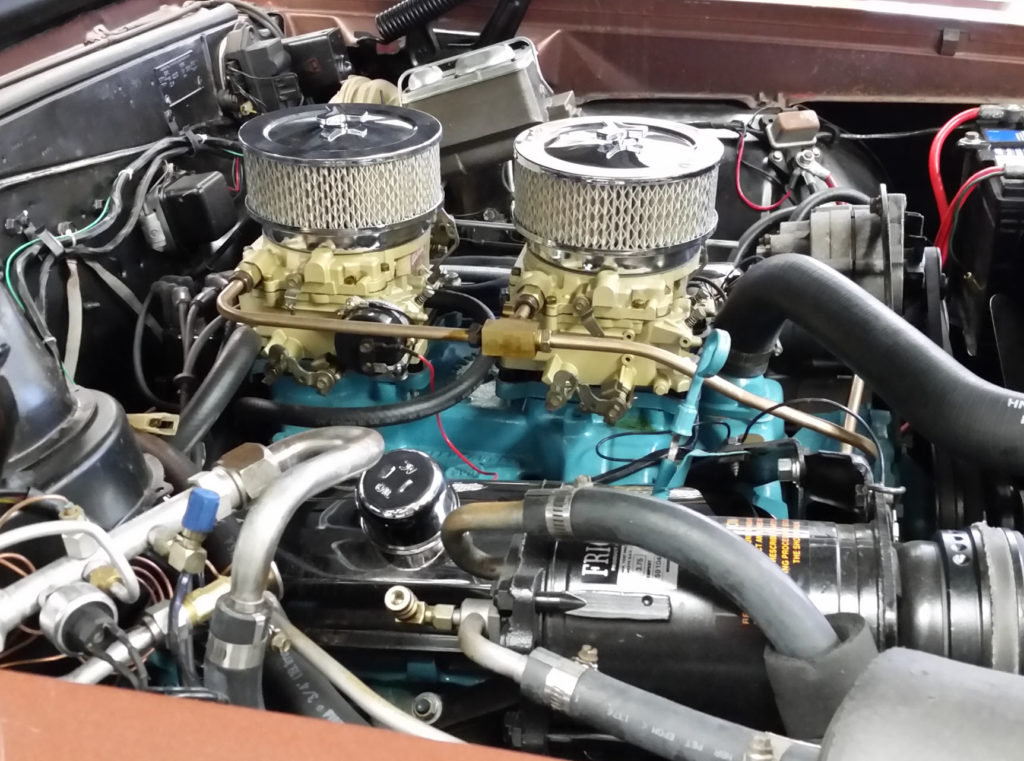
Once everything was together, I tried very hard to adjust the Tri-Power but the camshaft had reduced the vacuum enough that the power valve would not close off. I may have been able to get adjustment parts from John at Pontiac Tripower (pontiactripower.com) but I was frustrated by that time and switched to a dual-quad Offenhauser intake manifold with a pair of Edelbrock 500-CFM Carter substitutes: it doesn’t sound the same but it works very well.
At this point, I enjoy driving the car. I have done many other things to it as the months went by, but I could write a book which is too but for this newsletter. Let’s just say that I’m finally having fun with my car!
Guy Riffle

Bob Wilson's '68 GTO
May/June 2022
I have been a Pontiac fan since before I had my driver’s license. I started working at my stepfather’s ESSO service station when I was 14 years old. We would ride to work in his 1968 Firebird with a 400 CI engine and a Turbo Hydra-Matic 3-speed transmission. That was the car I used for my driver’s license test.
I bought my current 1968 GTO in the summer of 1980 when I was 21 years old. It was my second GTO. I also had a 1971 GTO with a 455 HO and a 4-speed Muncie transmission that I purchased when I was 19 years old. The ’71 GTO replaced my ‘71 T-37 as my daily driver. I had always wanted a ‘68 or ‘69 with hideaway headlights and I finally found one that I could manage to buy – even though I really didn’t have the money at that time as I was in college. I kept both cars for many years but eventually let the ‘71 go to a good home when I lost the garage space that I was using to store it. Both cars needed a lot of work, but neither was on the road and I decided it was best to keep only one. It was a very difficult choice, but I couldn’t bear to watch the ‘71 sit outside and turn to rust.
I kept the ‘68 roadworthy for about 10 years, but then I parked it in the garage when the starter failed, and it has not moved for about 30 years. When I was in school, I dreamed of using the first money I earned to improve the GTO. Then I bought a house right after I graduated and was about to start my dental practice. The car could wait a few years. Then I got married, had children, moved to a new house and all the other things in life took priority over making my GTO the car I had always wanted it to be.
Now both daughters are through college, one is married, and I have more miles behind me than in front of me! So, it is time to start working on the 1968 GTO.
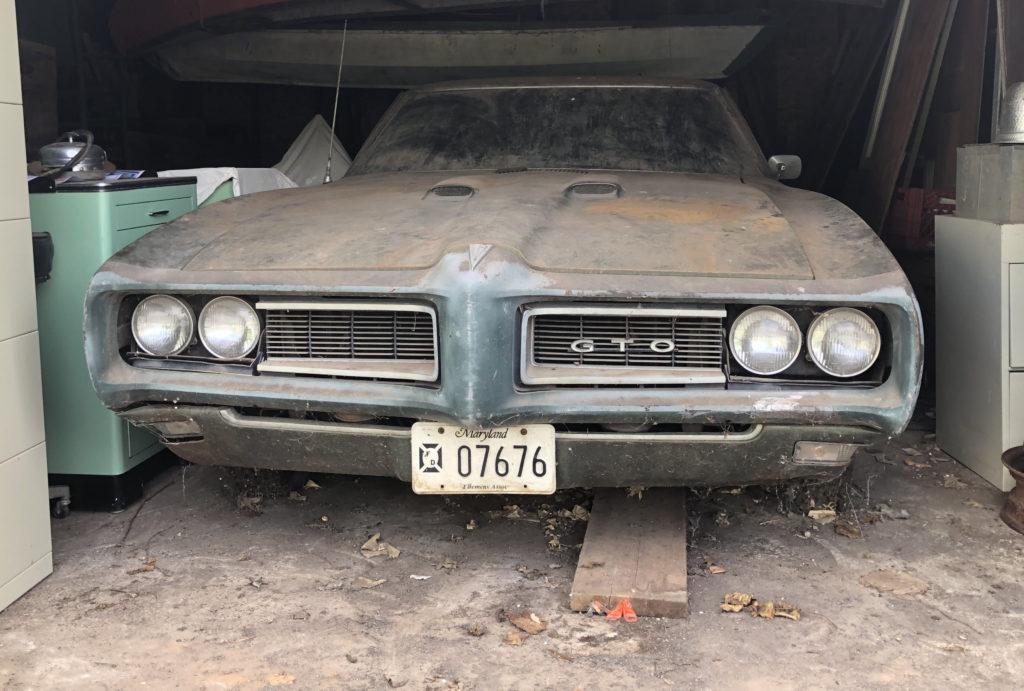
I was not sure where to start so I asked Google. As good fortune would have it, one of the first sites was a local club called The Royal GTO’s and Pontiacs. I emailed the contact provided and within minutes Guy Riffle responded with an invitation to discuss my car and attend a club meeting the following week. I attended my first meeting and received a very warm welcome from the officers and members. I was even able to meet the man who wrote the book on GTO restoration! I immediately knew that I had found the best resource to inspire, educate and assist me on the journey I have been anticipating for so many years. I was introduced as the newest member of the club that night. I must admit I am a bit ashamed of the current status of my GTO, but the members I spoke with were eager to hear about my car and provide encouragement and reassurance that my car can be restored to the condition it deserves. I was embarrassed to show the one picture I have of the car, and I did not intend on sharing, but before I left that night several members had seen it.
Every journey begins with a single step (according to a fortune cookie!) I look forward to the restoration of my 1968 GTO. I am delighted to be a member of this club. I can’t imagine a better first step. I look forward to sharing progress updates and more pictures in future newsletters.
Bob Wilson
Allen Swim's '69 LeMans 350 HO
May/June 2020
Technical Pointers
Table of Contents:
Numbering Your Alternator
Text & Photos By Dave Kroop (August 2019)
Being one who likes a challenge, I picked one recently just to see if I could do it. Now, what I am about to describe is a process that the average garage mechanic could not do unless he has a machine shop at his disposal. But nevertheless, how I did this may be of some interest or amusement. I am building a numbers-matching engine for my 1964 goat so the chances of finding a correctly-numbered alternator are nil to none. So, with that on the table I gave it some thought on what I could do. Well, as it turns out I had a couple alternators with no numbers on them. Probably had labels that fell off over the years. They had the correct outside look, complete with casting shapes. I had a group of them so I had noticed some had markings from the casting foundry that would not have been on the ‘64s. I picked an external regulated version also. Not totally sure if the fan blade is correct, but an easy fix, someday.
So, with a clean slate, so to speak, I did my research on the correct numbers, placement, and what each meant. I also measured the size of the numbers on a couple other alternators to see if the stamps varied. I also looked at the font styles used. After all that I figured out that I’m never going to get an exact match since the letters were deeply embedded and the fonts were different than my number/letter hand stamps. But they were close enough. I doubt anyone would know that my font was not correct or that my letter depth was insufficient. So, the next challenge came about in how to place these letters and numbers in the correct location (close enough) and in-line. Individual hand stamp characters are not made to line up so if you used one side of the stamp as a reference point, the letters would be high or low. To solve that problem, I had to first determine the offset of each stamp, then ground enough metal off the front side so the characters were all at the same height relative to that one side, the lowest character being the reference to the rest for metal removal. Picture 1 shows a modified stamp: note the ground surface. We are now into machine-shop level work as I had to use a surface grinder to do this modification with the required precision. The problem in trying to do all characters at the same time comes from the fact that you are marking a curved surface. Each character has a different position angle; hence a gang stamp would not work. You need to do them one at a time.
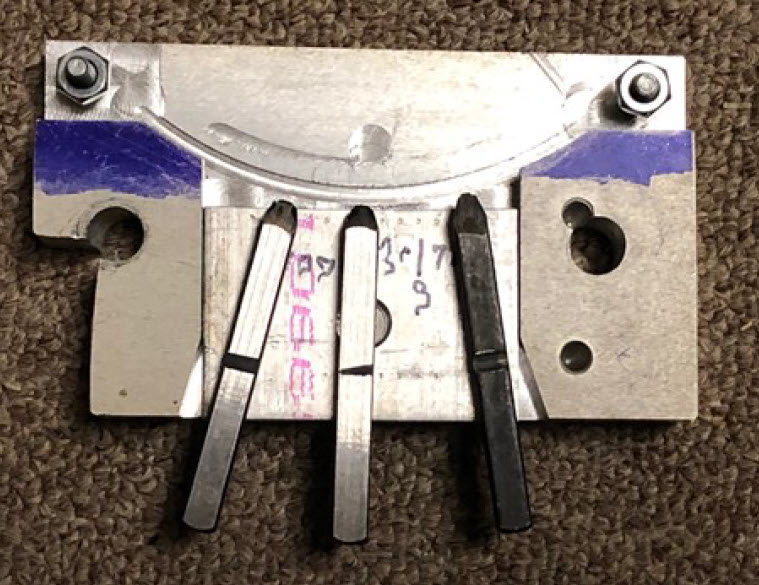
Picture 1: Alternator-Numbering Jig with Typical Number Punches
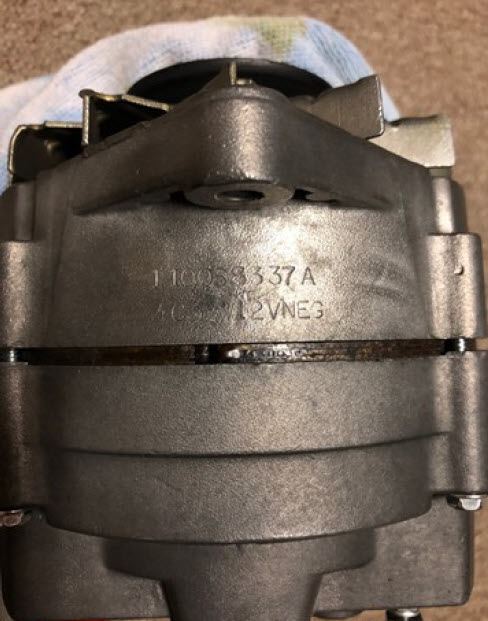
Picture 2: Numbered Alternator with 1964 Date and Code
With all that said, and made, the next challenge was to make an alignment guide for both lines of characters and their positions that could attach to the alternator shell. Picture 1 also shows this guide. It uses two of the alternator assemble screws to hold it into position and has a small groove that clamps onto the shell to give the shell some back support for when the stamp is hit with a hammer. We don’t want to crack the case, since it is only cast aluminum, which is brittle. There is a plate that attached onto the guide to provide two character-lines position. Thus, after one line is completed, the plate is moved and reattached for the second line. I measured the length of a typical line of GM-stamped characters and carefully marked those two positions on the guide. I then marked the relative positions of characters as a reference for placing each hand stamp. See Picture 1. With all that done and in place, I began stamping each character. Now, you only get one hit on the stamp, so take your time and place your blow to the center of the stamp head. If you try a second hit, you’ll usually end up with a doubled imprint. Keep in mind a space is typically one character wide. After all were done you can see from Picture 2 that they are shallow but clearly readable. I’d suggest smearing some black paint over them and then wipe off the excess to highlight the numbers.
As for the case finish, I offer a few comments as well. These aluminum cases oxidize with a white crust, over time. There are a lot of ways to remove this but the final look is not proper. This is cast aluminum, and hence wire blushing it causes texture changes that are not uniform. A light bead blasting works, but be careful as too much will impact the texture as well different reflective characteristics from spot to spot. Chemical cleaners can cause a grey splotchy finish. What I ended up doing was to lightly wire brush off the white crud, followed by a fine bead blasting of the surface to get a smooth look and finish up with a fine wire wheel brush. The fine-wire wheel is normally used in carding blued steel surfaces such as one may encounter in firearms. It does not impart any pattern or scratches.
With that I got a nice looking light-gray look as might be found on a “casting with a bit of aging.” That silver look on a new casting is a bit harder to create with chemicals as the aluminum brightens, giving an overkill look. Some of you may have a better solution and I’d like to hear from you.
Dave Kroop
The Case of the Frozen Carburetor Jet
By Dave Kroop (April 2020)
I’m sure most of you gear heads have rebuilt a carburetor at one time or another. You get it all apart because you plan on dipping it in carb cleaner. The last thing to pull out are those jets. If you’re doing a Carter AFB then you have two primaries, two secondaries and one accelerator pump check valve. Well, I acquired a 1965 AFB at a decent price and all numbers checked out.
Note if you really want to verify the year and transmission type the carburetor was originally used for, you need to look at the top of the primary venturi assembly and the part that attaches to the body wall. You will see a series of very small numbers on its top, inside a small oval on the casting. That number can be checked against a list that the Carburetor Shop has online: go to http://www.thecarburetorshop.com/GTO_AFB_carbs.pdf and look at the Primary Venturi Stamp Number in the list to find out how it was originally used.
So back to my story: Well, the secondary jets finally came out with no damage using a lot of PB Blaster, a strong screwdriver, and a strong arm. Next was the check valve: ditto there. Last were the primary jets: Wouldn’t budge, so I tried heat to loosen them up: still wouldn’t budge. So, I just gorillaed it some more after sharpening the screwdriver’s tip, but the screwdriver slipped. shearing off the slot top. Now I’m stuck with a jammed jet and no slot to grab onto. I nixed the idea of using an “easy out” as I figured I’d just end up with a broken tool. So, after some thought and a handy milling machine, I decided to see if I could drill them out without damaging the threads in the body. I used the old secondary jets to measure the thread size. It turns out it is a standard 5/16-24 thread. The minor thread diameter is an “I” drill (the one you use to drill a hole in metal to then thread a 5/16-24 hole.) The jet’s center hole was used was used as a locator. So, with the lower body securely mounted on the mill table, I used a drill blank the size of the jet placed in my drill chuck, to accurately align the jet’s center with the mill’s spindle. Once I had the center aligned, the next step was to pick a drill that was slightly undersized to avoid possible thread damage to the carb body. I ended up picking a 1/4″ drill. Since the jet is made of brass, I decided not to just push the drill into the hole since brass has a habit of grabbing a cutter and quickly pulling it deeply into itself. Thus, I locked the spindle and manually moved the knee up for better feed control. As it turned out, once the drill was through the jet, the remaining metal easily came out using a pick and tweezers. Once all the debris was cleared, I ran a 5/16-24 hand tap carefully into the hole until it stopped. In this case, I used a bottoming tap as it completely cleaned out the threads. And finally, I ordered a new pair of jets from one of the online carb shops. While I was at it, I ordered a new set of metering rods.
This technique, I realize, is beyond the capability of the average home-garage-car owner. But it shows that if you have a valuable carburetor with this sort of problem, it can be saved. The only requirement is that the jets must be perpendicular to the body base. If they are at some angle, it may still be possible if you can get a drill into the center hole, but it would require some sort of angled jig. Using a simple powered hand drill may work, but you may nick the threads on one side or the other. If that’s all you have, use a series of drill sizes leading up to a final diameter of 1/4″ drill and run it at a slow speed as the drill will still grab. Hold the drill motor steady. You don’t want the drill to pierce the case under the jets bottom. After you have drilled it out, I’d suggest a sharp pick or dental pick, and a magnifying glass. Gently pull the curved thread remnants away from the body thread and pull it out with a plier or tweezer. Follow up with a tap. These dimensions apply only to Carter AFBs, but the technique should work on any jet. Just determine the existing jets’ thread pitch and outside diameter, then look for a bit that fits the thread’s inner dimension (minor diameter). As an example, the AFB jet measures 0.308″ OD while the tap is 0.312″. The minor diameter of that sized thread is 0.272″. With a 0.250″ drill you are left with about a 0.011″ diameter of metal in the hole. For typical thread tolerances, you have pretty much cut out the jet s body.
If all else fails, see if you can ask a carburetor shop about the jet’s thread pitch and diameter. The above link can certainly help. Finally, for you club members, if you need help, contact me. No guarantees, but I alight be able to help.
Dave Kroop
Compression and Camshaft Selection for Pump Gas Operation
by Stuart Polansky (March 2022)
In the Pontiac V8 “Strato-Streak” world, it’s generally accepted that you can’t run more than 9.5:1-compression ratio and run on pump gas with factory iron heads. If, in designing your new street engine, you go by this guideline, you may or may not end up with an engine that performs as well as (you hope) it should. That’s because that 9.5:1-compression ratio is only part of the story. Camshaft selection will determine if it runs well, is a dog, or if it makes great power, but only with race gas.
The key is understanding that there are two compression ratios in an engine that need to be considered: “static,” the one we are all familiar with, and “dynamic,” the one that the camshaft helps determine.
Static compression, the ratio of (swept volume + chamber volume)/(chamber volume) is the one we normally calculate, and indeed where we begin.
Swept volume = bore² × stroke× π ÷ 4. We must convert the result in inches, to cubic centimeters, or “cc”s. To do so, multiply by 2.54ᶟ or 16.39.
Chamber volume = actual combustion chamber volume + volume of the head gasket + volume of valve reliefs + volume of the cylinder from the top of the piston to the deck of the block. If the pistons are dished or domed, that volume must be added or subtracted, respectively, from the chamber volume total.
For example, a stock 455: assume a “zero-deck” engine, one where the piston is even with the top of the deck at top dead center (TDC). Assume 7cc valve reliefs and a 96cc combustion chamber. Using Fel Pro 1016 head gaskets, spec’d at 9.4cc compressed, we add the numbers and get a total combustion chamber volume of 112.4cc. Let’s round-off to 112cc, since none of these measurements are that precise.
Now, for swept volume: bore is 4.151”, so bore² ÷ 4 = 4.308”; π = 3.14, stroke is 4.21”, so volume is 56.98 cubic inches per cylinder. Converting cubic inches to cc 56.98 × 16.39 = 934cc (rounding again).
So the 455’s static compression ratio is (934 + 112) ÷ 112 = 9.34:1 Pretty good! Well, maybe…
The key to the puzzle is dynamic compression. The difference between static and dynamic compression is that dynamic compression takes the camshaft into account. More specifically: the intake-valve closing point. In calculating static compression, we assume the entire swept volume is being compressed, but in fact, it isn’t. That is, unless the intake valve closes when the piston is at the bottom of the bore or bottom dead center (BDC). In the real world of operating gasoline engines, the intake valve closes AFTER BDC (ABDC).
It seems pretty obvious once you think about it, but here is the issue: no compression can take place while the intake valve is open. So, compression begins after the intake valve closes. To determine that point requires measurements or a cam card.
In the case of hydraulic (flat tappet or roller) cams, the “advertised” duration numbers are used. Even though this spec is at 0.004” to 0.006” of lobe lift, the whole of this calculation remains an approximation, and this is pretty close.
In the case of solid lifter cams (again, flat or roller tappet), the manufacturer’s specifications are usually at something like 0.020” lobe lift. But there is lash to be considered as well, and the accepted formula for determining the “Advertised” duration of a solid lifter cam is: LASH/ROCKER RATIO + 0.004”.
In either case, hydraulic or solid tappet, lobe center separation and advancing (or retarding) the camshaft installed position will affect the intake valve closing point as well.
One more piece of the puzzle is connecting-rod length. Knowing connecting rod length and crankshaft stoke, we can use geometry to determine the position of the piston when the valve closes, and that determines how much compression actually takes place. For instance, in our 455 example, if the intake valve didn’t close until 90˚ ABDC, or halfway to top dead center, then the dynamic compression would be halved, or about 4.7:1!
By far, the quickest and easiest way to do these calculations is using a dedicated calculator. I use a calculator downloaded from the Pat Kelly link, but the Wallace Racing on-line calculator works well also.
Experienced engine builders tell us that the ideal dynamic-compression ratio for pump gas engines is between 7.5:1 and 8.5:1. If you choose to design for 8.5:1, ensure your combination is right: light car, decent gearing, good cooling system, well-tuned fuel and ignition systems, etc. If your design ends up closer to 7.5:1, the engine may be a little lazy, not an over-performer, but it should still run well. Aiming for 8.0-8.3:1 gives a little cushion for that poor load of gas on a hot summer day sitting in traffic.
Taking the 455 example with a static compression ratio of 9.3:1, let’s look at three camshaft examples. Included are screenshots of the Pat-Kelly-calculator results.
Example: A Crower 60245 Hydraulic Camshaft

Note that we cannot use the timing events in the chart because the opening and closing numbers are at 0.050” tappet lift. To determine intake closing timing: use 311˚ advertised duration, assume cam is installed “straight-up,” which means the intake centerline will be 108˚ ATDC, per the note in the specs that the cam was ground with 4˚ of advance built-in, since the lobe separation is 112˚. So, half of 311˚ duration is 155.5˚. That duration appears both before and after the intake centerline. So, the intake valve opens at 108˚- 155.5˚ = 47.5˚BEFORE TDC (BTDC). And the intake valve closes at 108˚ + 155.5˚ = 263.5˚ ATDC; but bottom dead center is 180˚ from top, so 263.5˚ – 180˚ = 83.5˚ ABDC.
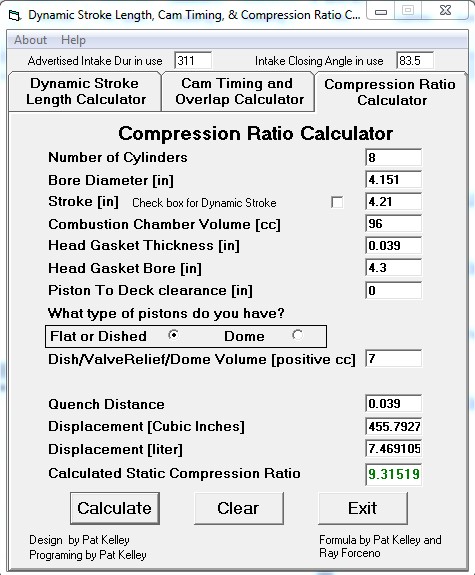
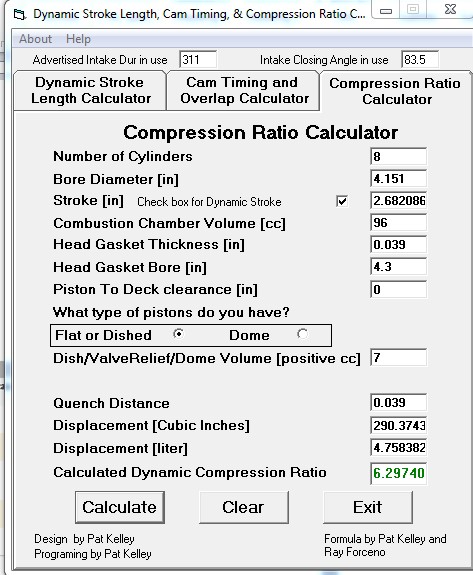
Plugging the known numbers about the 455 into the calculator is done in three steps: cam timing, dynamic stroke length, and compression.

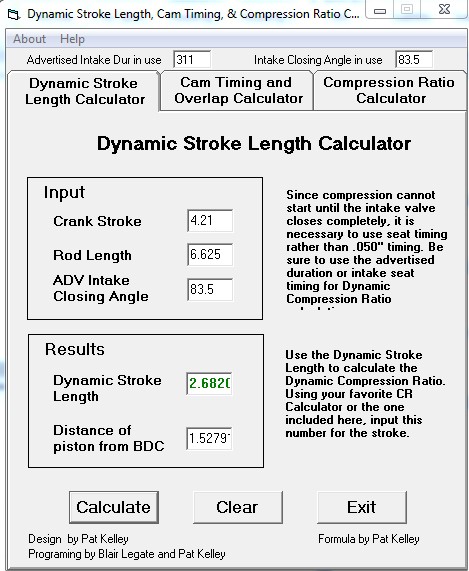
Note in the upper right screen shot that the dynamic stroke is only 2.68”! Far less than the static 4.21”.
The lower-left window shows a static compression of 9.3:1 like we calculated earlier. The lower-right window shows a dynamic compression of 6.3:1. This engine will run horribly and be a dog! On the other hand, fuel quality won’t be a concern.
Example: A Summit 2802 Hydraulic Camshaft
Now, how about a Summit 2802 hydraulic cam, a more moderate and “streetable” cam, with less “lope.” Here is the cam card:
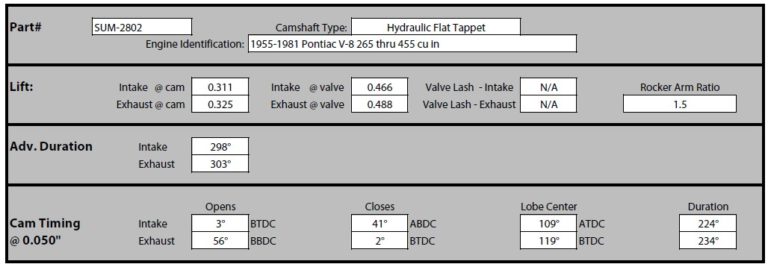
If the camshaft is installed “straight up,” the intake centerline (ICL) will be 109˚ ATDC. Intake duration is 298˚, so the intake valve closes at [109˚ +298˚/2 -180˚] = 78˚ ABDC. From the calculator:
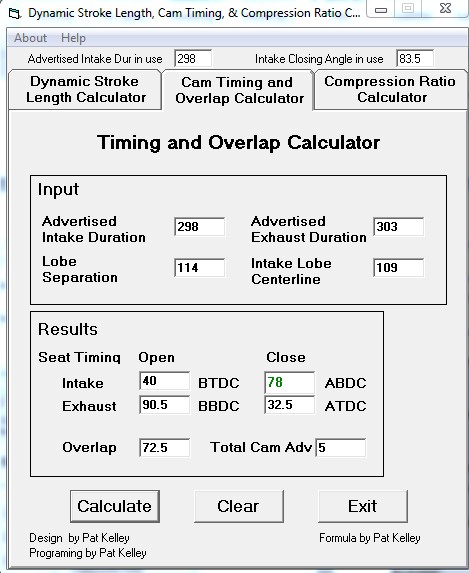

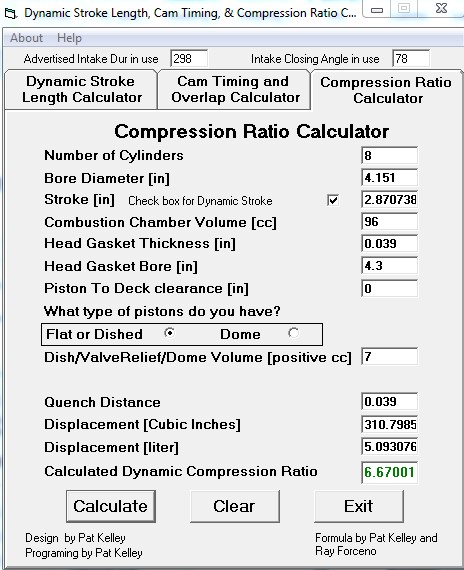
So with this cam, dynamic compression jumps to 6.7:1: a little better than the first cam but not worth the trouble. A bit less of a dog, but still a dog.
Example: An Ultradyne 272/282 F-10 Solid-Lifter Camshaft
The last example is an Ultradyne 272/282 F-10 solid-lifter cam. Here is the cam card:
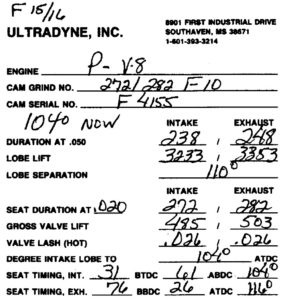
Note that this cam has tighter lobe separation, 110˚, versus the two earlier camshafts. This tends to build low-RPM cylinder pressure. It is designed to be installed with 6˚ of advance, which also “advances” the closing angle of the intake valve. The advanced grind is reflected on the cam card in the “104˚ NOW” statement (110˚ – 6˚).
The comparison of timing between the three cams is interesting: while the Crower cam has the most duration advertised and at 0.050” (311˚/316˚ & 248˚/252˚,) the Summit cam has 298˚/303˚ & 224˚/234˚. But the Ultradyne solid-lifter cam has 272˚/282˚ advertised duration (26˚-21˚ less than the Summit,) but 238˚/248˚ at 0.050”, or 14˚ more than the Summit at valve lifts that matter when air is really flowing past the valve. Such is the solid-lifter advantage: faster valve ramps provide faster opening and closing.
Now for the calculator:
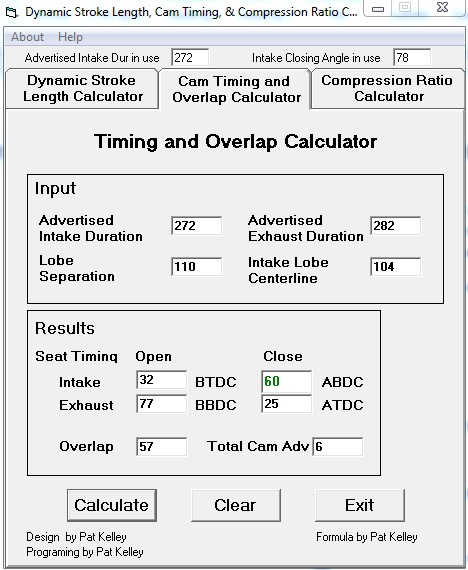

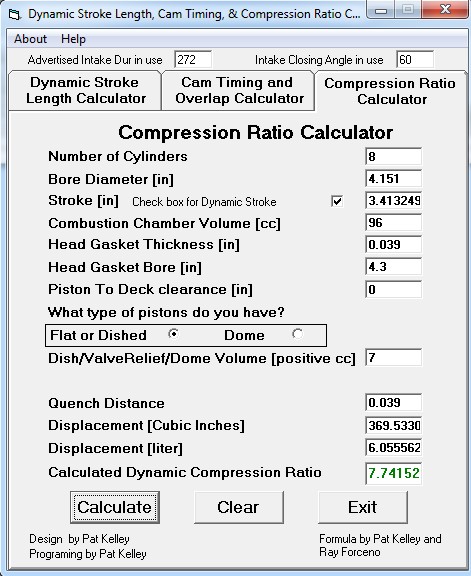
Dynamic compression is now 7.74:1, in the acceptable range. Compared to the Crower we picked up 1.45 points of compression (!), 0.73” of stroke and about 80 cubic inches! Such is the importance of picking the correct cam.
With this same engine, having the heads shaved to increase compression about a ½ point will make it ideal.
The Crower cam would work fine in a higher RPM engine (better heads, forged rods) with another 1.5-2 points of static compression. The Summit cam needs at least ¾-point of compression to be “in the zone”.
A Final Note
The reason these cams and this engine were chosen for the example is because this 455 is in my car, with the Crower cam. A quick and easy way to replace the 350-ci in the 74 GTO, this was meant to be cheap and built with parts on-hand or available inexpensively. I knew better, but didn’t do the calculations! In the middle of the project, the COVID epidemic hit, along with a major personal health issue. So that quick, temporary project has been in the car for well over a year now. The Summit cam is sitting on my shelf. Ultradyne/Bullet has no cam blanks to grind. A blank was found and is in my possession, and as soon as life gets out of the way, the ’74 should be running a whole lot better. It just won’t sound as fast!
Club Background
The Beginning
In June 1982, the Royal GTOs club was formed by a group of automotive enthusiasts dedicated to the hobby of collecting, restoring, and preserving the Pontiac GTO and other Pontiac car models. We are interested in friendship, the exchange of ideas, meeting and helping other GTO and Pontiac owners, and getting people interested in entering this hobby or in getting back into it. To this end, we are a chapter of the GTO Association of America, a national organization that promotes the restoration and enjoyment of this milestone automobile.
Our club has many talented members with skills for working on automobiles. Engine and transmission rebuilding, upholstery work, and painting are just some of the things our members do. We have also successfully promoted local car shows at various locations that have brought many diverse people together with a common love of automobiles.
The charter members who started the Royal GTOs are Paul Zazarine, Chuck Roberts, James Oakley, Dennis Bridgett, Perry Roberts, Jerry Drechsler, and Mark Mento.
Club Stories
Why the Chapter is Called the Royals
(Inspired by posting from Reggie Horning, 19 Feb 2018)
At the end of the 1950s, Pontiac Motor Division was evolving its old-man image to a younger man’s brand. The new general manager, Semon “Bunkie” Knudsen, developed a highly competitive racing program that included NASCAR and NHRA. To support this successful program, Pontiac engineers had created a full catalog of special factory racing parts.
The aggressive focus on racing brought a more enhanced youthful image that translated into a sales boost that exceeded corporate expectations for the Pontiac rebrand. Supporters within Pontiac of corporate involvement in racing and keeping the sales growing included an ambitious young Pontiac dealer from Royal Oak, Michigan, named Ace Wilson Jr.
Wilson felt there were many young new-car buyers like himself who would welcome having access to Pontiac’s high-performance parts catalog and the knowledge and expertise that the racing program could provide, directly through a dealership’s service department. Wilson took his idea to the Pontiac suits, who liked it so much they assigned him to develop the project.
Wilson began offering dealer-modified cars using factory high-performance parts supported by knowledge from the factory engineers. Cars from this new dealer service were called “Royal Pontiacs,” and the chapter’s name pays homage to Wilson’s vision.
Why the Chapter Logo Looks Like It Does
(Inspired by posting from Reggie Horning, 19 Feb 2018)
Royal Pontiac-prepped cars very successful in racing circuits and were called “Royal Bobcats,” which could host of up to 38 different upgrades and options. The basis of the Royal Bobcats were high-performance tweaks, a unique paint scheme, and Royal Bobcat badging, which was typically added to the rear roof pillar but could vary from model to model. The racing-team logo evolved to a character called “Philo” carrying the Royal Bobcat badge on his shoulder, as seen below:

The chapter logo uses Philo, who is instead carrying a GTO badge, since the club originally focused on GTO models. This is why our chapter logo looks as it does:

Club By-Laws
Section I – Chapter Name
(A)
The club’s name shall be “The Royal GTOs and Pontiacs.”
Section II – Chapter Addresses
(A)
The mailing address of the chapter shall be that of the elected Treasurer.
(B)
The internet domain of the chapter website shall be “www.royalgtos.com.”
(C)
The Facebook group name of the chapter shall be “ROYAL GTO and PONTIAC CLUB.”
Section III – Chapter Purpose
The chapter is a social club organized for pleasure and recreation, namely a group of automotive enthusiasts dedicated to the hobby of collecting, restoring, and preserving the Pontiac GTO and other Pontiac car models. We are interested in friendship, the exchange of ideas, meeting and helping other GTO and Pontiac owners, and getting people interested in entering this hobby or getting back into it.
Section IV – Requirements for Membership
A member shall pay an annual-membership dues of $30, which is collected by January 30th of each year in support of membership reporting criteria of the national organization, which shall be known as the GTO Association of America, or GTOAA. The dues shall be used to support annual chapter activities including, but not limited to, the chapter newsletter as well as free classified advertisements in said newsletter, and activities such as car shows sponsored by the chapter. Failure to pay annual dues shall result in the loss of chapter privileges.
Section V – Officers’ Titles and Responsibilities
(A)
The President shall preside at all meetings, and shall be the chief executive of the club. They shall have general supervision over the development of the club’s entire program. They shall make all committee appointments subject to approval of the Board of Directors.
(B)
The Vice President shall perform the duties of the President in their absence, and perform other duties as may be prescribed by the Board of Directors.
(C)
The Secretary shall keep the minutes of each meeting and submit them to club officers as required.
(D)
The Treasurer shall be responsible for the collection and distribution of all funds for the chapter, and will maintain a financial record regarding the chapter’s receipts and expenditures. They shall maintain a file of reports, a file of correspondence, and maintain an up-to-date record of any business of the chapter. They shall maintain a record of all member data received, and shall be responsible for reporting required chapter data to the GTOAA.
(E)
The Historian shall maintain a collection of past documents and items that record the history of the club.
(F)
The Webmaster shall maintain the club’s website, Facebook page and any other social media forums as the club may choose to engage in.
(G)
The Newsletter Editor shall be responsible for producing and distributing the club’s newsletter.
(H)
The Car-Show Chairman shall be responsible for organizing and directing the club-sponsored car shows.
(I)
The Director of Merchandising shall be responsible for obtaining and selling club-related promotional materials such as “T” shirts, badges, and stickers.
Section VI – Meetings
(A)
Membership meetings will be held on the second Wednesday of even-numbered months at a time and location designated by the President. Board of Directors meetings will be held on the second Wednesday of odd-numbered months, if required by the President. Special meetings can be held on the special call of the President.
(B)
A meeting shall be called to order and led by the President or their representative. The leader shall present chapter status and items of interest as determined by the President or their representative. Free and open discussion of topics shall be encouraged by opening the floor to questions of and comments by chapter members. The meeting shall be closed by the President or their representative.
Section VII – Election of Officers
(A)
It is understood that all Officers shall serve without remuneration.
(B)
The elected officers shall remain in their positions until they step down, or unless the club decides by majority vote that they need to be replaced, at which time an election will be held for a member to fulfill the position.
(C)
Emergency elections, as may be needed to fill a vacancy, shall be held as needed.
(D)
Candidates are elected to office by a simple majority of those members present at the scheduled chapter meeting or emergency meeting.
Section VIII – Amendments
The bylaws shall be amended by a majority vote of members present at any scheduled chapter meeting.
Lorem ipsum dolor sit amet, consectetur adipiscing elit. Ut elit tellus, luctus nec ullamcorper mattis, pulvinar dapibus leo.